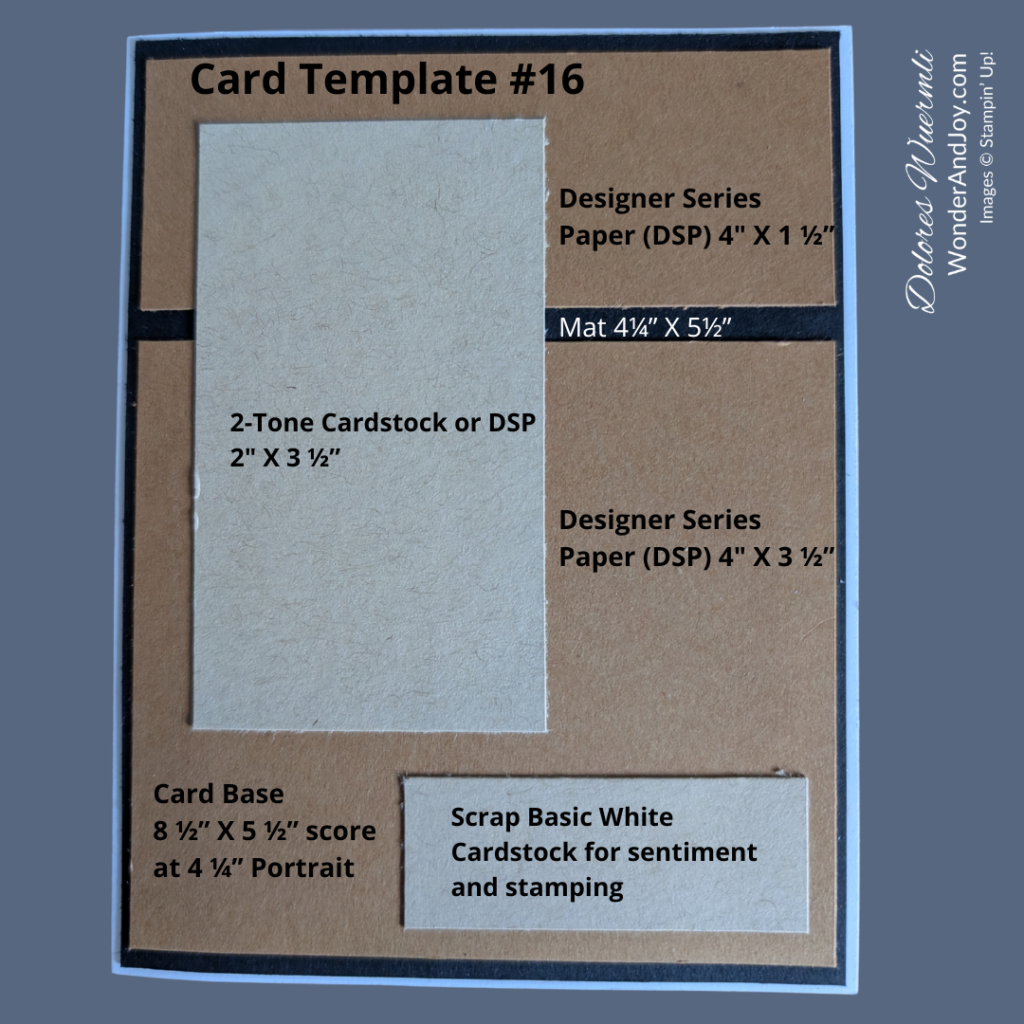
Here we are with card template #16! This template is versatile and can be created portrait or landscape.
For the third example I turned it upside down. It was great fun working with this Template. I hope that you can pull out products you have or try some new ones with this sketch.
I have used Basic White thick card stock measuring 5 ½” X 8 ½” scored at 4 ¼” for each of my examples. You could use coloured card stock for the card bases instead of using a Mat piece for a special change. Adding a 4″ X 5 ¼” basic white card stock piece on the inside of your card if the card base is a darker colour would make it easier to write a greeting.
For a good year we have had Two-toned Cardstock in all our Stampin’ Up colours. On the bottom of Page 67 of the catalogue you can see three sets of Two-tone Cardstock that go with different Suites. This is a great way to try this paper out and acquire the colours. There are sometimes packages on sale in the Last Chance as well. They can also be purchased in each individual colour in packs. This gives us three shades (or hues) of paper in the same colour. They are also lighter in weight than the regular cardstock. So great for layering!
Let’s get creating…
Card Example #1: Thankful for you – Fern & Flora
The beautiful Moonlit Flora Suite Collection is a gorgeous new collection of products. It features Golden Glow, Old Olive, Mossy Meadow, Peaceful Pine, Secret Sea, and Berry Burst from our colour collections. Two of the colours are 2026-2028 In Colors. The one product I didn’t use in the Collection is the Floral Spray 3D Embossing Folder. It fills a full 6X6 sheet of paper. It is so beautiful of ferns and leaves.
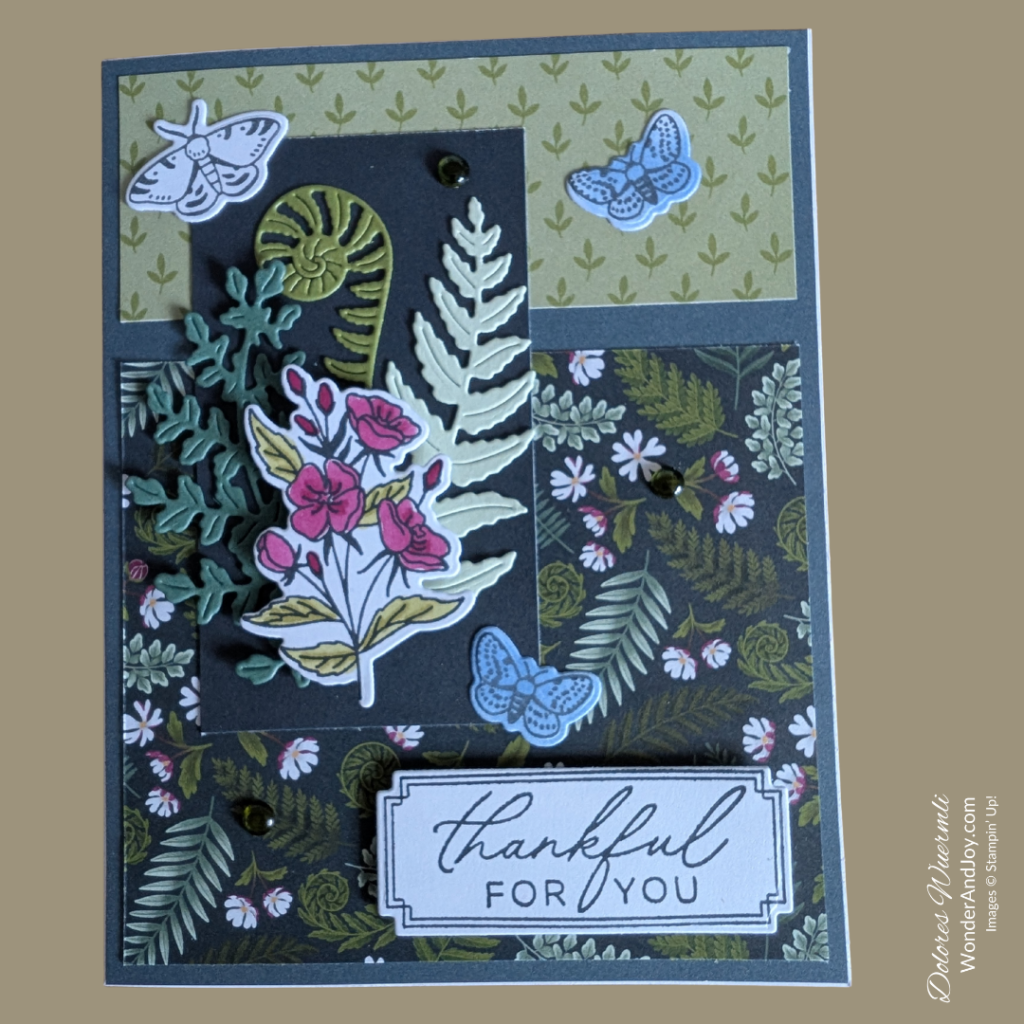
The card base is Basic White Thick Cardstock (8 ½ X 5 ½ and scored at 4 ¼). I cut a piece of the Secret Sea two-toned cardstock 4 ¼ X 5 ½ and using the lighter side adhered it to the cardbase with Multipurpose Glue. I chose a piece of the DSP from the Moonlit Flora DSP, 4 X 1 ½ and then the same DSP but the other side measuring 4 X 3 ½. These were glued on top of the Secret Sea cardstock.
Two-Tone Cardstock in Secret Sea (dark side) measuring 2 X 3 ½ use glued to the left side of the card overlapping the two DSP pieces. I decorated this piece with leaf cutouts in Peaceful Pine, Old Olive and Soft Sea Foam using the Fern & Flora dies. These were glued to the Secret Sea piece.
I stamped onto Basic White Cardstock the larger flower bundle and the butterfly (2 of them) and moth with Memento ink from Fern & Flora stamp set. I coloured the flower with Stampin Blends in Berry Burst and Old Olive. The two small butterflies I used the new Hydrangea Hue ink pad and a blending brush to colour. These pieces were die cut with the Fern & Flora dies. The flowers were attached to the card with dimensionals and the butterflies & moth with glue.
The Sentiment was stamped on Basic White Cardstock in Memento ink and cut out with the label die from the Fern & Flora die set. This was attached to the bottom right corner of the card with dimensionals. This Suite Collection has a package of lovely gems called Dewdrops Embellishments and I scattered three of the green ones around the card. Each time I look at this card it feels like new life. This is a stunning card don’t you think?
Card Example #2: Happy Birthday – Words & Wishes
Words & Wishes is a stamp and die set that has great sentiments: a cake, candles and presents. The Dies have a backing layer for the words and also include a great label for sentiments. There are a few other goodies included in this set.
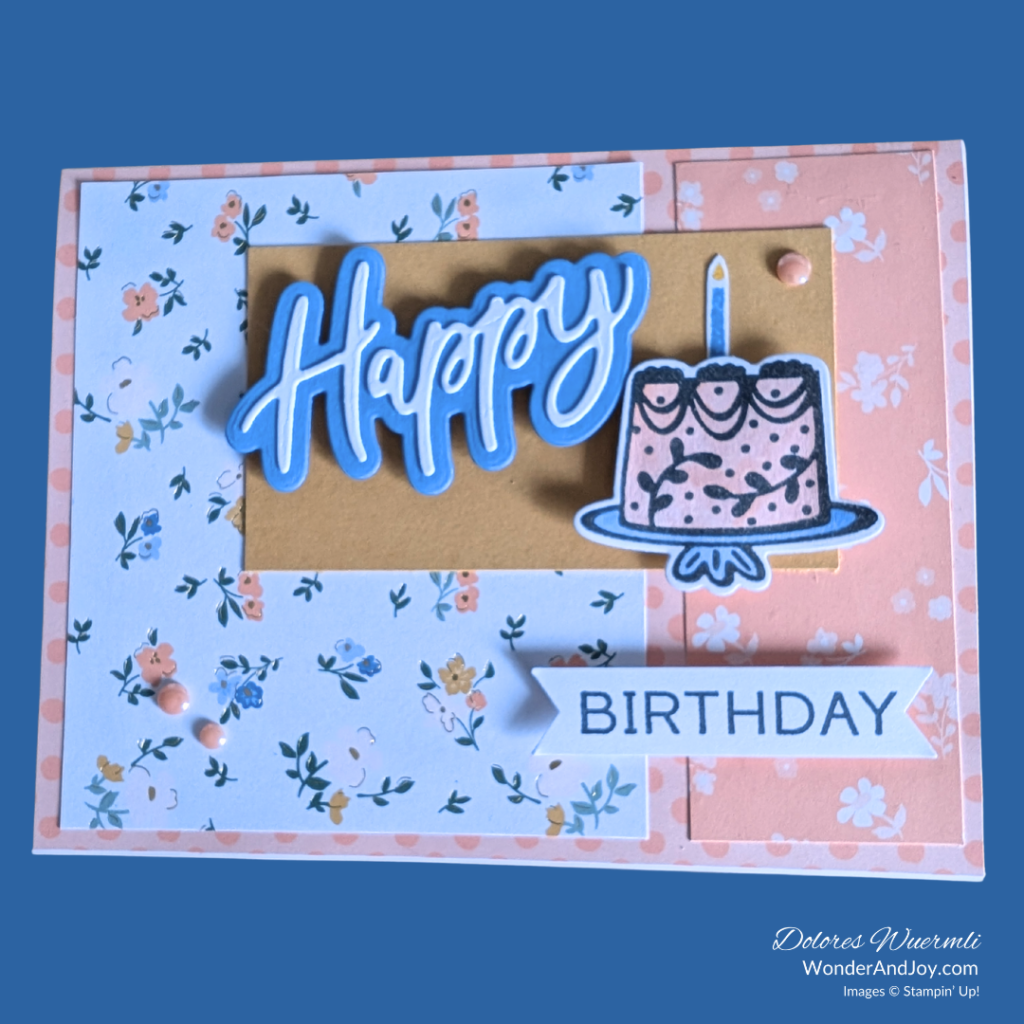
For this card I made the card landscape and so turned the design. The cardbase is Basic White Thick Cardstock (8 ½ X 5 ½ and scored at 4 ¼).
I used the smaller polka dot in Crisp Cantaloupe from the 2026-2028 In Color Painted Pattern DSP for the mat measuring 5 ½ X 4 ¼. This was glued to the cardbase.
There is a set of Specialty Designer Series Paper that features the new In Colors including gold. It is really lovely paper. It’s called Bloom Boutique. I chose two different flower patterns for the next layer of the card. One piece measuring 3½ X 4 and the other 1½ X 4 and glued these on top of the polka dot piece.
For the 3 ½ X 2 piece I chose Golden Glow from the Cardstock Assortment of the 2026-2028 In Color and glued with on top of the DSP.
From the Words & Wishes Stamp set I stamped on Basic White cardstock the cake in Memento ink and coloured it with ink pads in Crisp Cantaloupe and Hydrangea Hue using a Water Painter. I also stamped the candle in Hydrangea Hue and the flame in Crushed Curry. I stamped Birthday with Memento Ink and cut it out with the Three Banner punch. The cake was cut with the Words & Wishes die.
With the Hydrangea Hue cardstock, I die cut the Happy background. The inner Happy die cut was die cut in Basic White cardstock and backed it with Adhesive Sheets before running it through the embossing machine. The Happy, Cake and Sentiment were attached with dimensionals. This card was finished with gems from 2026-2028 In Color Dots in Crisp Canteloupe. The petite flowers with hints of gold on the DSP and the die cuts all coordinate so well together. Don’t you think this card would cheer someone on their special day?
Card Example #3: A Little Thanks – Lily of the Valley
I had to learn patience with this collection of products, Valley in Bloom Suite Collection, as it quickly became unavailable during our preorder in April. It was the set that caught my attention right away. I think something of these flowers remind me of the beautiful blue bells we enjoyed each spring in the UK. For this card I used each piece of the suite except the 3D Embossing folder. It’s a large one but so beautiful. Will have to play with it soon.
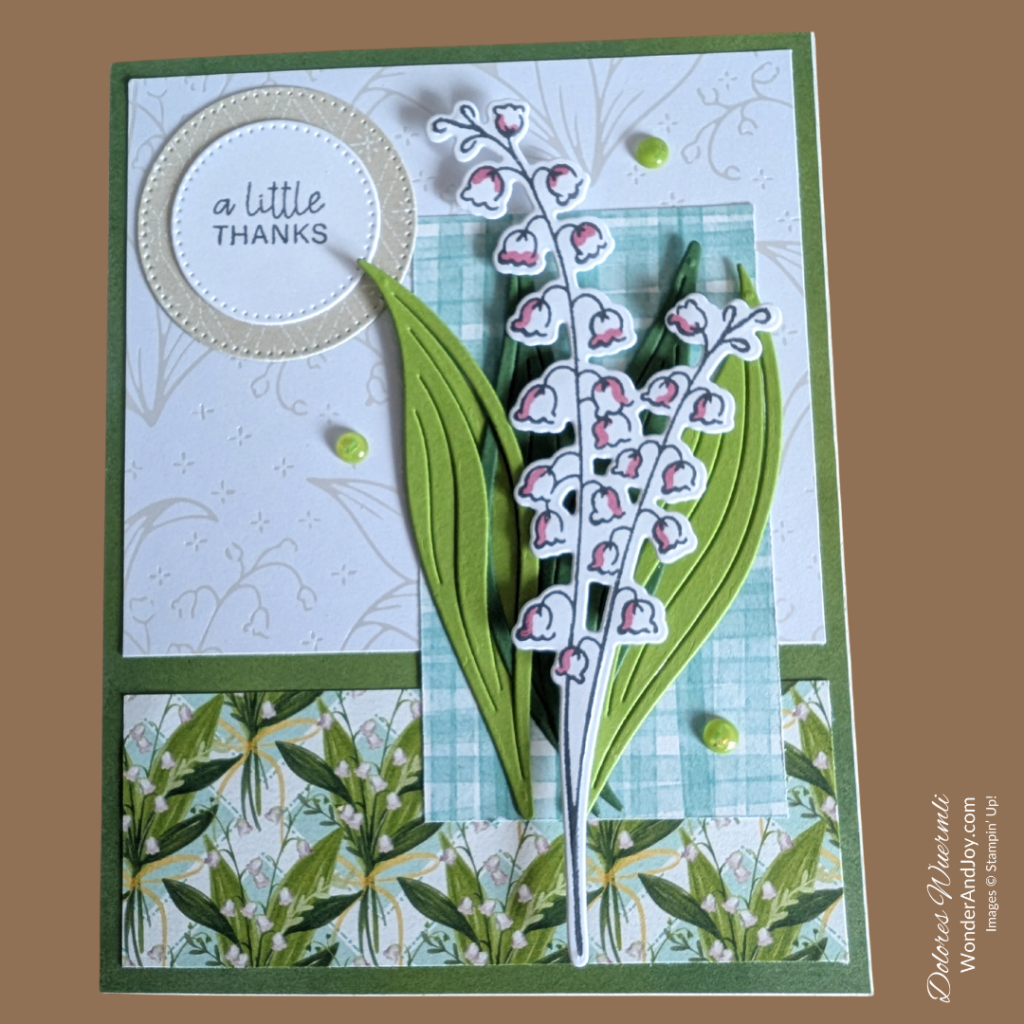
This card starts with Basic White Thick Cardstock (8 ½ X 5 ½ and scored at 4 ¼) and then adhered the Mat layer in a piece of DSP from Valley In Bloom that is a green watercolour wash. A Specialty Designer Series Paper called Luxe White with a Lily embossed pattern is the next layer of the card measuring 4 X 3½ glued to the top portrait of the card. There are three designs to this beautiful white paper. A pattern paper from the DSP of Valley In Bloom measuring 1½ X 4 was glued to the bottom section of the card.
The 3½ X 2 piece is another DSP from Valley In Bloom and this was glued down on the right side of the card. On top of this piece I added four leaves die cut from Lily of the Valley in Garden Green and Granny Apple Green cardstock. These were overlapped and glued to the DSP. I stamped the large lily stamp on Basic White scrap in memento ink and coloured the edges of the flowers with Light Blackberry Bliss blends. Using mini dimensionals this was adhered to the top of the leaves after being die cut.
The one die set I turn to over and over again is the Stylish Shapes. So grateful it is in this new catalogue on Page 60! I stamped the sentiment “a little thanks” in memento ink on a scrap of Basic White and die cut it using the 2nd smallest circle of Stylish Shapes. Using a Beige piece of DSP from Valley in Bloom I die cut it using the 3rd smallest circle and then layered them gluing to the card in the upper left hand corner.
The Shimmering Dots in this Collection are in Coastal Cabana, Granny Apple Green and White with a bit of sparkle in them. I chose three Granny Apple Green dots to complete the card. This is a bright spring card that was so fun to make.
I thoroughly enjoyed making these cards and using this Card Template #16.
Are you up for giving it a try? It was fun to use it in different directions. And the sentiments were different shapes as needed for the supplies or the placement. How would you change up this Template?
Please view a full list of the products that I used here. It includes the stamps, die cuts, cardstock, designer series paper, colours and adhesives. If you’d like to order any of the products, simply add them to your cart. For every order over $25 you receive 10% in rewards for your next order or until your rewards expire (usually in one year) when you have opted into Stampin’ Ups rewards program.
There are new products being released often in the Stampin’ Up world! Make sure to check them out in my Shop and go to Shop Products and see Online Exclusives.
THANK YOU for selecting me to be your Stampin’ Up! ® Demonstrator. Do connect with me if you have any questions!
It’s so much fun to create and experience the Wonder and Joy of stamping together with you! Have a great rest of the month as we all prepare for summer!
Blessings,

Card Template #16 Dimensions
- Card Base 8 ½” X 5 ½” score at 4 ¼” Portrait
- Mat 4 ¼” X 5 ½”
- Designer Series Paper (DSP):
- 4 X 1 ½”
- 4 X 3 ½”
- Cardstock (Two-tone cardstock or DSP):
- 1 – 2 X 3 ½”
- Scrap Basic White Cardstock for sentiment and stamping
If you want a Mat for these pieces to be adhered to cut it at 4 ⅛” X 5 ⅜” using Cardstock or Designer Series Paper
Card Example 1 Thankful for you – Fern & Flora
- Card Base 8 ½ X 5 ½ score at 4 ¼ Portrait
- Two-tone Secret Sea cardstock Mat 4¼ X 5½
- Designer Series Paper (DSP) Moonlit Flora:
- 1 – 4 X 1½
- 1 – 4 X 3½
- Two-tone Secret Sea cardstock 1 – 2 X 3½
- Scraps Peaceful Pine, Old Olive and Soft Sea Foam
- Scrap Basic White for stamping sentiments
Card Example 2 Happy Birthday – Words & Wishes
- Basic White Card Base 8 ½ X 5 ½ scored at 4 ¼ Landscape
- 2026-2028 In Color Painted Patterns DSP in Crisp Cantaloupe Mat 4¼ X 5½
- Specialty Designer Series Paper (DSP) Bloom Boutique:
- 1 – 3½ X 4
- 1 – 1½ X 4
- Golden Glow cardstock 1 – 2 X 3½
- Scraps Hydrangea Hue
- Scrap Basic White for stamping sentiments and die cutting
Card Example 3 A Little Thanks – Lily of the Valley
- Card Base 8 ½ X 5 ½ score at 4 ¼ Portrait
- Valley In Bloom Designer Series Paper (DSP): Mat 4¼ X 5½
- Luxe White Specialty Designer Series Paper (DSP): 1 – 4 X 3½
- Valley In Bloom Designer Series Paper (DSP): 1 – 4 X 1½, 1 – 2 X 3½, scrap
- Scrap Basic White for stamping sentiments