This sketch is a basic and simple card template that provides a great starting point to create unique and diverse handmade cards with your Stampin’ Up! products.
It’s been a joy to work with the March Online Exclusive products and card template #14.
All stamps from Stampin’ Up! are now made with Photopolymer and come in the new packaging. They take less space to store. And the die cuts are in the same size packaging as well. I noticed for a couple of the sets they have multiple dies of smaller ones so you can cut more at one time! A great time saver.
Are you ready with your favourite drink to enjoy this time together as we explore card template #14?
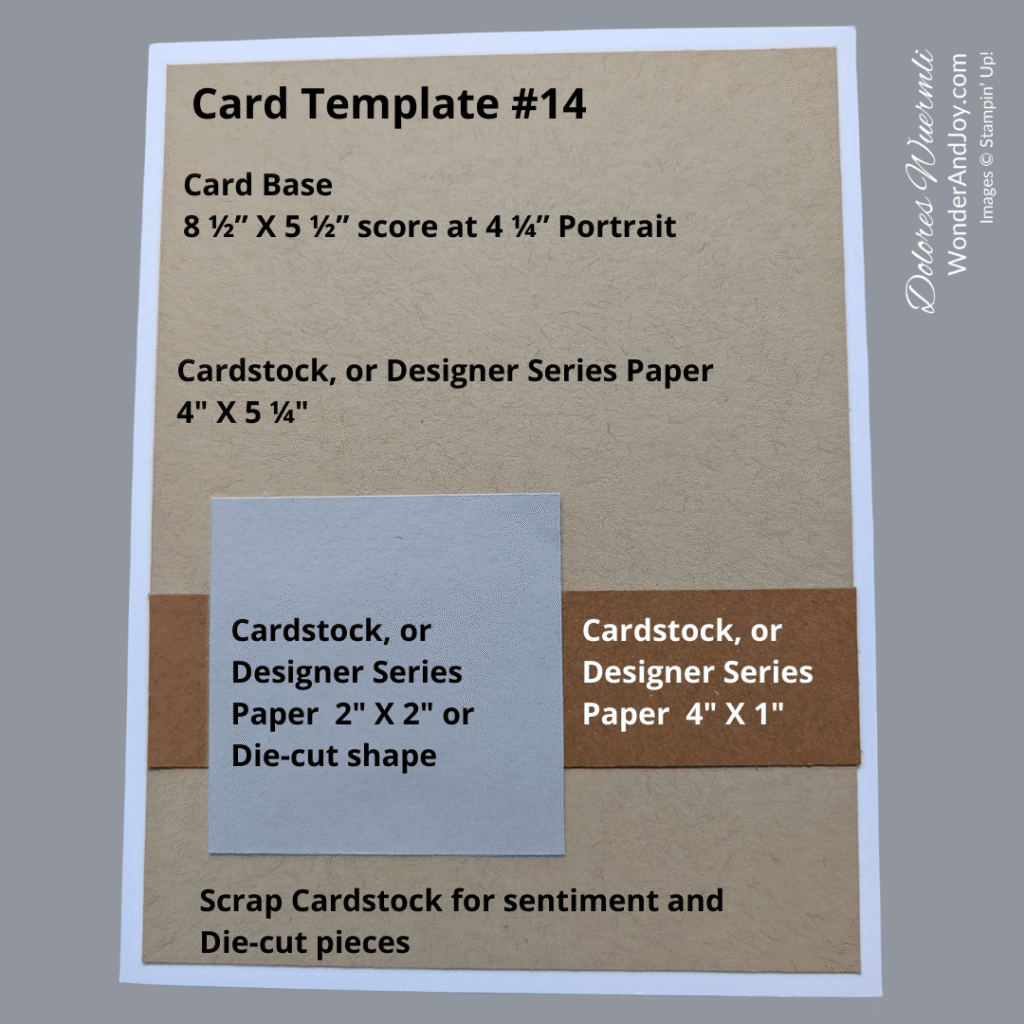
For each of the three cards today I have used Basic White thick cardstock measuring 5 ½” X 8 ½” scored at 4 ¼” for each of my examples. Coloured Cardstock can be used for the card bases, if you wish. I have used Designer Series Paper (DSP) for the background and strip on each of the cards. This could be switched up with Cardstock if you would prefer, or even stamp your own background. There are so many options with card template #14!
Card Example #1: Hope you feel your best soon – Delicate Whispers
I really like this Delicate Whispers stamp set bundle and the Designer Papers. It is so pretty! There is one new colour featured as a sneak peek for the new 2026-2028 In Colours that will be revealed in early May in this collection. It’s Hydrangea Hue, a beautiful blue. Bronze is also featured in some of the paper. It adds a richness to the collection.
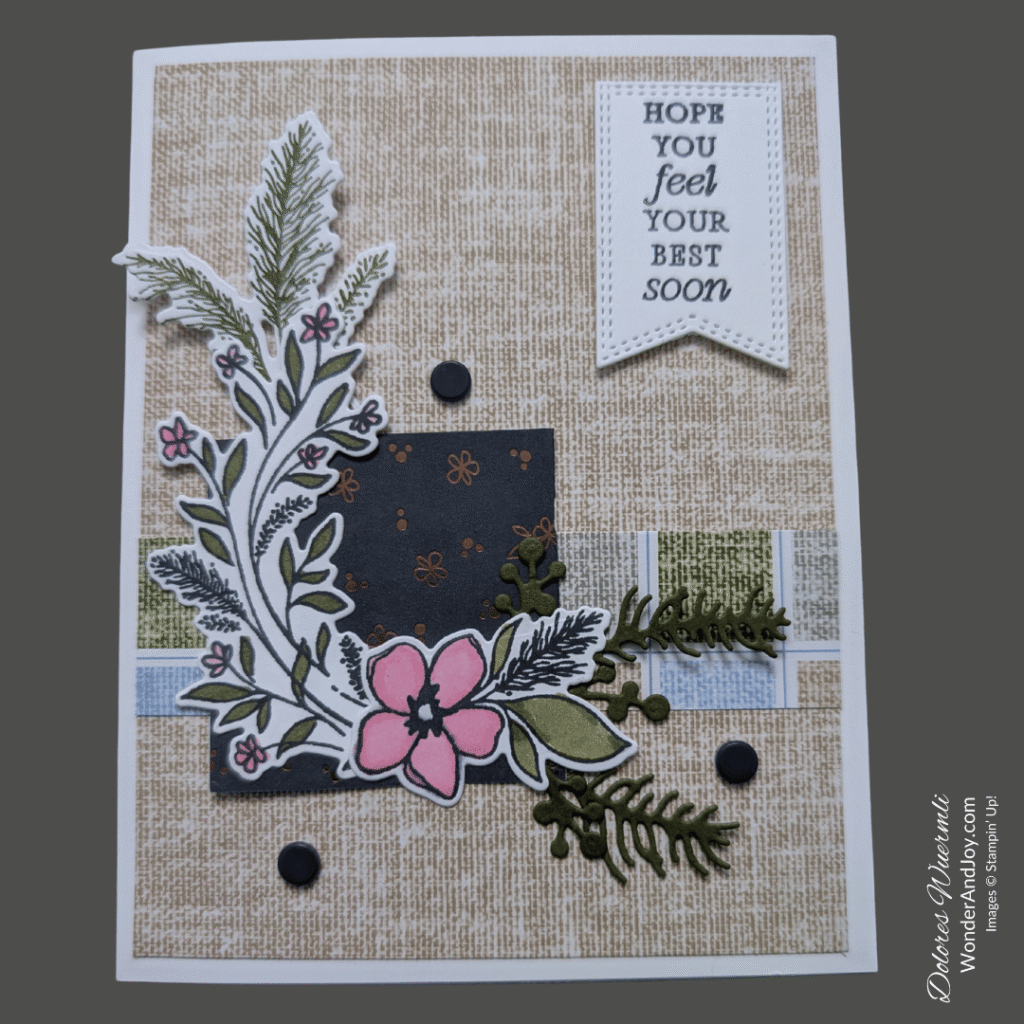
The card base is Basic White Thick Cardstock (8 ½” X 5 ½” and scored at 4 ¼”). I used three different patterns from DSP Delicate Dreams and cut them as follows:
1 – 4″ X 5 ¼” Crumb cake background linen look
1 – 4″ X 1″ Woven plaid look
1 – 2″ X 2″ Secret Sea with bronze flowers
I layered these with Multipurpose glue to the White cardbase. On a piece of Basic White cardstock I stamped the individual flower, branches, and one of the sprigs with Memento ink from the Delicate Whispers Stamp set. I coloured them with Stampin’ Blends in Mossy Meadow, and Bubble Bath. I die cut these out and also a few of the leaves in Mossy Meadow cardstock.
The sentiment I stamped in Secret Sea on Basic White cardstock and then die cut with the second from the smallest Nested Essentials dies. The sprigs and flowers I glued on top of the Secret Sea 2″ X 2″ piece to the bottom left of the card. The sentiment was attached to the top right hand corner with dimensionals.
To complete the card I used three of the Natural Matte Dots in Secret Sea. I love how this card turned out and it could be used for various occasions by switching up the sentiment. A pot of soup and this card would be a great gift to cheer up someone recovering from an illness or hard situation.
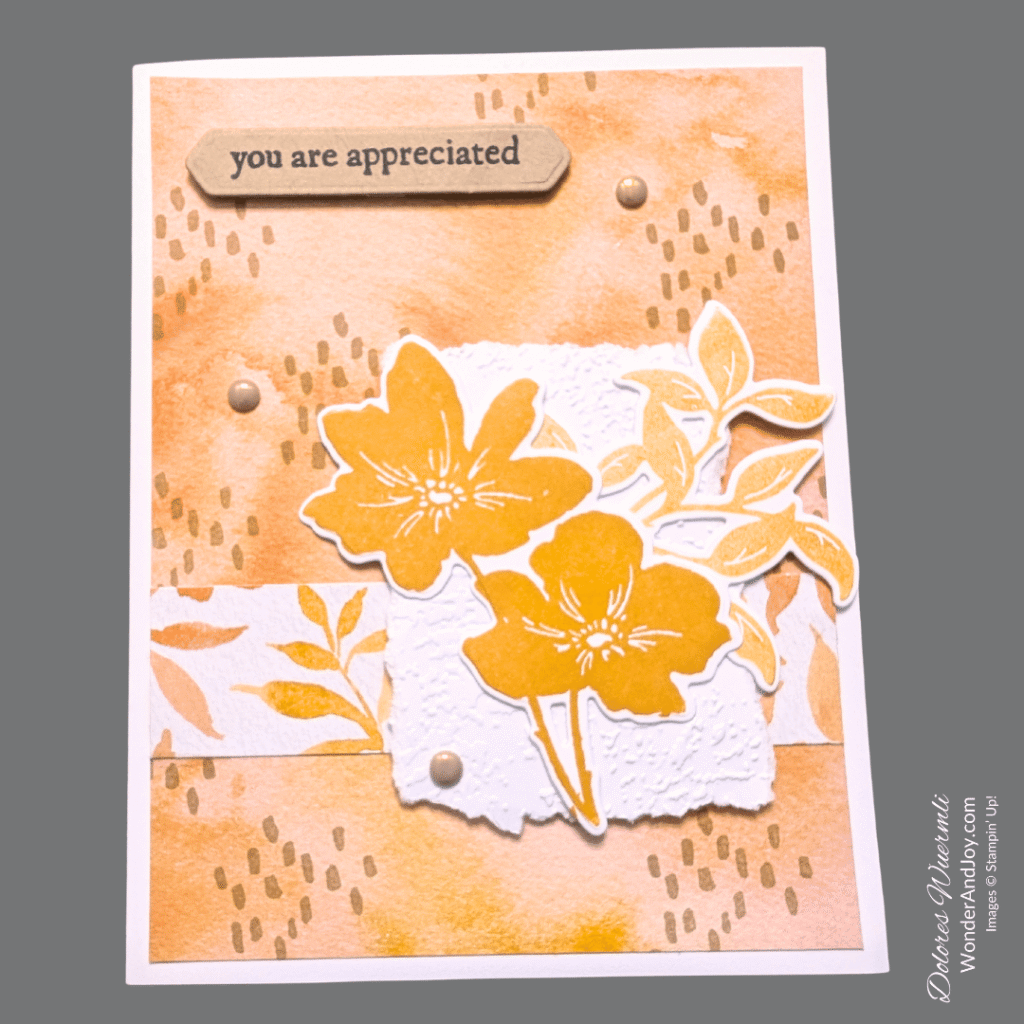
Card Example #2: You Are Appreciated – Paradise Garden
This suite of products, Garden Poetry, has a stamp set containing 14 stamps with filled in leaves, flowers, some dotage and four lovely sentiments. The dies cut out each of the flowers and there are three label dies as well. There is a larger die that cuts leaf shapes but they stay in the paper and a hybrid embossing folder that you can use on it’s own or with the larger die. It’s a really cool effect. I didn’t use it on my card but had fun making a sample.
The Garden Poetry Designer Series Paper is 12” X 12” featuring ten of our colour family with flowers and leaves in a watercolour effect on one side and the other in variegated watercolours. A specialty paper, called Garden Textures 12” X 12” in Berry Burst, Blueberry Bushel and Shaded Spruce, is also available. Lots of great potential for these papers. Ribbon and Epoxy Dots are also part of this suite. You can purchase the products all under Garden Poetry Suite or each separately.
Let’s dive into the card!
I cut a piece of the Garden Poetry 12” X 12” DSP in Crushed Curry and used the watercolour side, 4″ X 5 ¼”. Using the dotage stamp and crumb cake ink and randomly stamped the paper. I attached this to the Basic White Thick Cardstock (8 ½” X 5 ½” and scored at 4 ¼”).
With the same DSP, I cut a strip of 4″ X 1″ and used the leaf/flower side and attached it to the card with the top of the strip about 2” from the bottom of the card. I embossed a 2 ½” X 3″ piece of Basic White cardstock with the Exposed Brick 3D Embossing Folder. I then tore the sides of the paper. This was attached to the right side of the card with dimensionals.
I stamped the double flower in Crushed Curry ink and the group of leaves (2nd generation) ink and die cut these elements. They were glued on top of the embossed piece. I stamped the greeting “you are appreciated” in Black Memento ink on Crumb Cake cardstock and cut it with the label die cut. This was attached to the top left of the card with dimensionals. The Pearls of Beauty gems were perfect to finish off the card.
Moving the “square” piece (from the template) around is a fun way to see what works best with your papers and elements.
Card Example #3: With Sincere Thanks – Scalloped Wishes
In the Scalloped Wishes bundle, there’s a dragonfly stamp and die cut dragonfly! They are both fun and different sizes. The two scalloped frames are really lovely too. One thing I love to see in nature is bulrushes (also known as cattails). There is a trio of them as a stamp with a die to cut them out. I love the sentiments as well in this set.
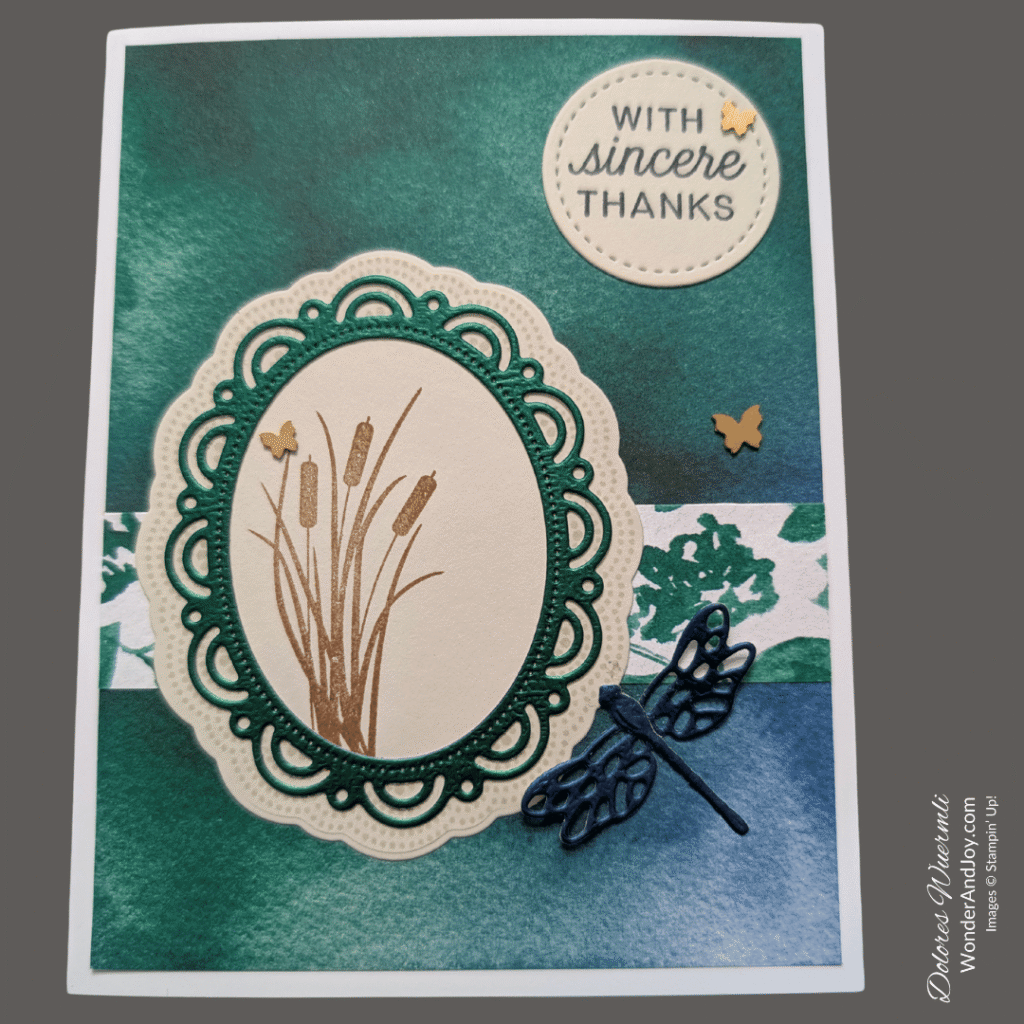
The card starts with Basic White Thick Cardstock (8 ½” X 5 ½” and scored at 4 ¼”). I cut a piece of the Garden Poetry DSP measuring 4″ X 5 ¼” in the Shaded Spruce and Blueberry Bushel watercolour piece. This was glued to the front of the white cardstock. A strip of the same paper in 4″ X 1″ and flipped over for the watercolour flowers and leaves show with the white background.
On a piece of Basic Beige cardstock I stamped the large scallop stamp in Basic Beige ink and die cut it. I stamped the bulrush stamp in Pecan Pie to the left of the scallop. I die cut the small scallop frame with the Shaded Spruce Garden Textures Specialty Foil Sheet, and also the Dragonfly wings and body from the Dies with the Blueberry Bushel Garden Textures Specialty Foil Sheet, assembling it with a dab of glue. The frame was attached with glue onto the Basic Beige scallop piece and then attached to the left side of the card. The Dragonfly was glued (just on the body) to the bottom right of the frame.
On a scrap of Basic Beige I stamped “With Sincere Thanks” in Secret Sea ink and die cut it with the small circle from Stitched Shapes die. This was glued to the top right hand corner of the card.
The perfect finishing touch were three Brushed Brass Butterflies on the card. I hope you have some in your collection of gems as they are no longer available, sadly!
This card template #14 sketch is so basic and simple, but can be changed up in so many ways. Each of these cards look unique and different but the starting point is the same. I hope that you have fun with your supplies and get creative with this card template #14!
Please view a full list of the products that I used here. It includes the stamps, die cuts, cardstock, designer series paper, colours and adhesives. If you’d like to order any of the products, simply add them to your cart. For every order over $25 you receive 10% in rewards for your next order or until your rewards expire (usually in one year) when you have opted into Stampin’ Ups rewards program.
There are new products being released often in the Stampin’ Up world! Make sure to check them out in my Shop and go to Shop Products and see Online Exclusives and new catalogue. Let me know if you’d like a hard copy of the Jan 6 – May 4, 2026 Mini Catalogue. The Annual Catalogue is being phased out this year and will be replaced with three smaller catalogues released throughout the year: May-Aug, Sep-Dec and Jan-Apr.
THANK YOU for selecting me to be your Stampin’ Up! ® Demonstrator. Do connect with me if you have any questions!
I have enjoyed introducing you to these new products form Stampin’ Up but above all giving you ideas of how you can use what you have already! It’s so much fun to create and experience the Wonder and Joy of stamping together with you!
Blessings,

Card Template #14 Dimensions
- Card Base 8 ½” X 5 ½” score at 4 ¼” Portrait
- Cardstock, or Designer Series Paper (DSP):
- 1 – 4″ X 5 ¼”
- 1 – 4″ X 1″
- 1 – 2″ X 2″ or Die-cut shape
- Scrap Cardstock for sentiment and Die-cut pieces
If you want a Mat for these pieces to be adhered to cut it at 4 ⅛” X 5 ⅜” using Cardstock or Designer Series Paper
Card Example 1 Hope you feel your best soon – Delicate Whispers
- Basic White Cardstock 8 ½” X 5 ½” scored at 4 ¼”
- Delicate Dreams DSP 1 – 4″ X 5 ¼”, 1 – 4″ X 1″, 1 – 2″ X 2″ (using 3 different DSP patterns)
- Scrap Basic White for stamping sentiments and flowers/leaves
- Scrap Mossy Meadow for diecuts
Card Example 2 You Are Appreciated – Paradise Garden
- Basic White Cardstock 8 ½” X 5 ½” scored at 4 ¼”
- Garden Poetry DSP 1 – 4″ X 5 ¼”, 1 – 4″ X 1″
- Basic White Cardstock 1 – 2 ⅕” X 3″
- Scrap Basic White Cardstock
- Scrap Crumb Bake Cardstock
Card Example 3 With Sincere Thanks – Scalloped Wishes
- Basic White Cardstock 8 ½” X 5 ½” scored at 4 ¼”
- Garden Poetry DSP 1 – 4″ X 5 ¼”, 1 – 4″ X 1″
- Basic Beige Cardstock
- Garden Textures Specialy Foil Sheets