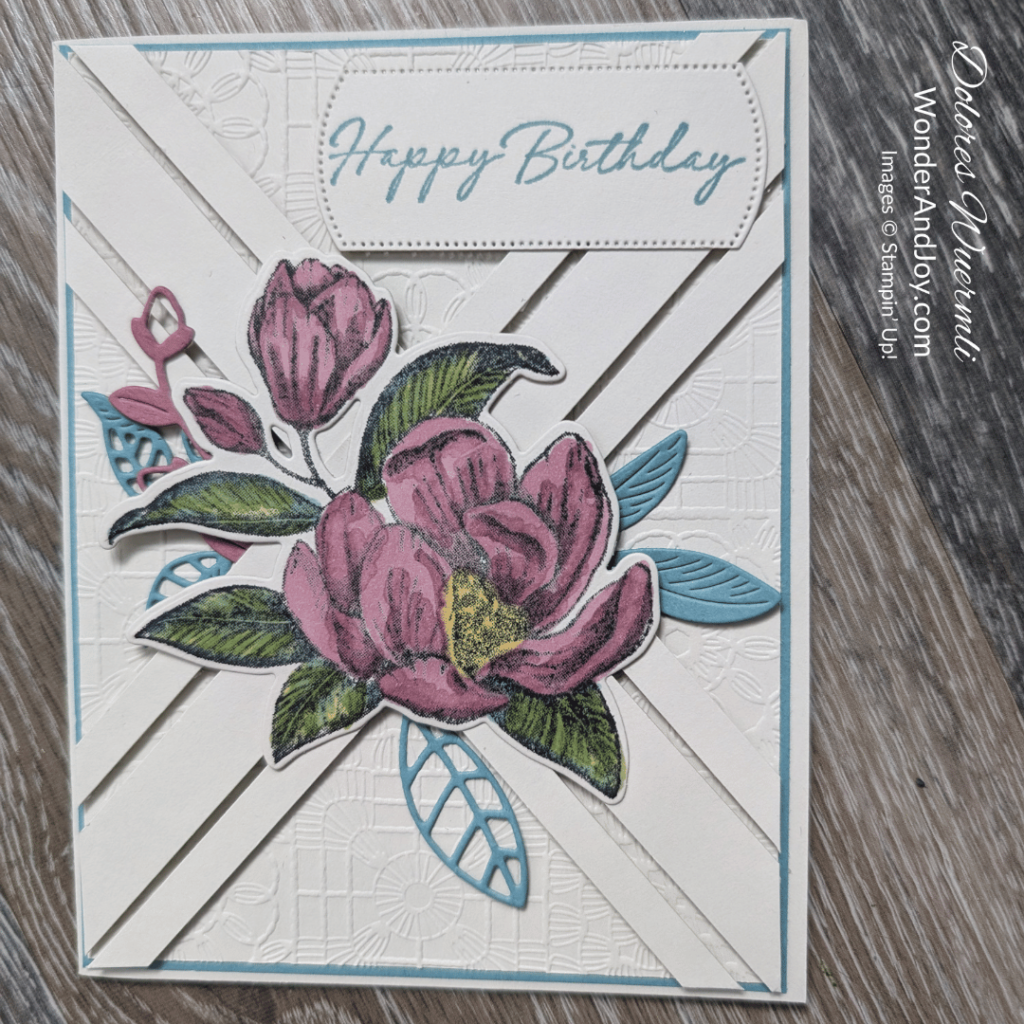
A Happy Birthday card using Stampin’ Up! Magnolia Mood Bundle of stamps and dies
Have you seen Magnolia flowers in full bloom? They usually blossom in spring and are quite impressive. They can be white, pink to purple. The Magnolia Mood Bundle of stamps and dies are available online but do not appear in the Annual Catalogue, so you might have missed this lovely bundle. The dies cut out the stamped images plus there are other flower and leaves dies to accent or use on their own.
One little trick with cutting out the very detailed magnolia die if it’s not totally cutting through your die cut machine is to place a dryer sheet (new or old) onto the bottom plate, then put your paper down, next the die and the top plate, and run it through. This extra bit will help the tiny cuts and extra markings to be more distinct. You can use this trick with any detailed die! Works amazingly.
I saw a special card that Jane Proffitt from Pennsylvania made using the Thoughtful Expressions hummingbird and flowers. What attracted me the most was the paper behind the elements. How did she do that? Well, it’s actually really quite simple! Should we dive into the card we created inspired by Jane?
A beautiful handmade card using Magnolia Mood stamp set

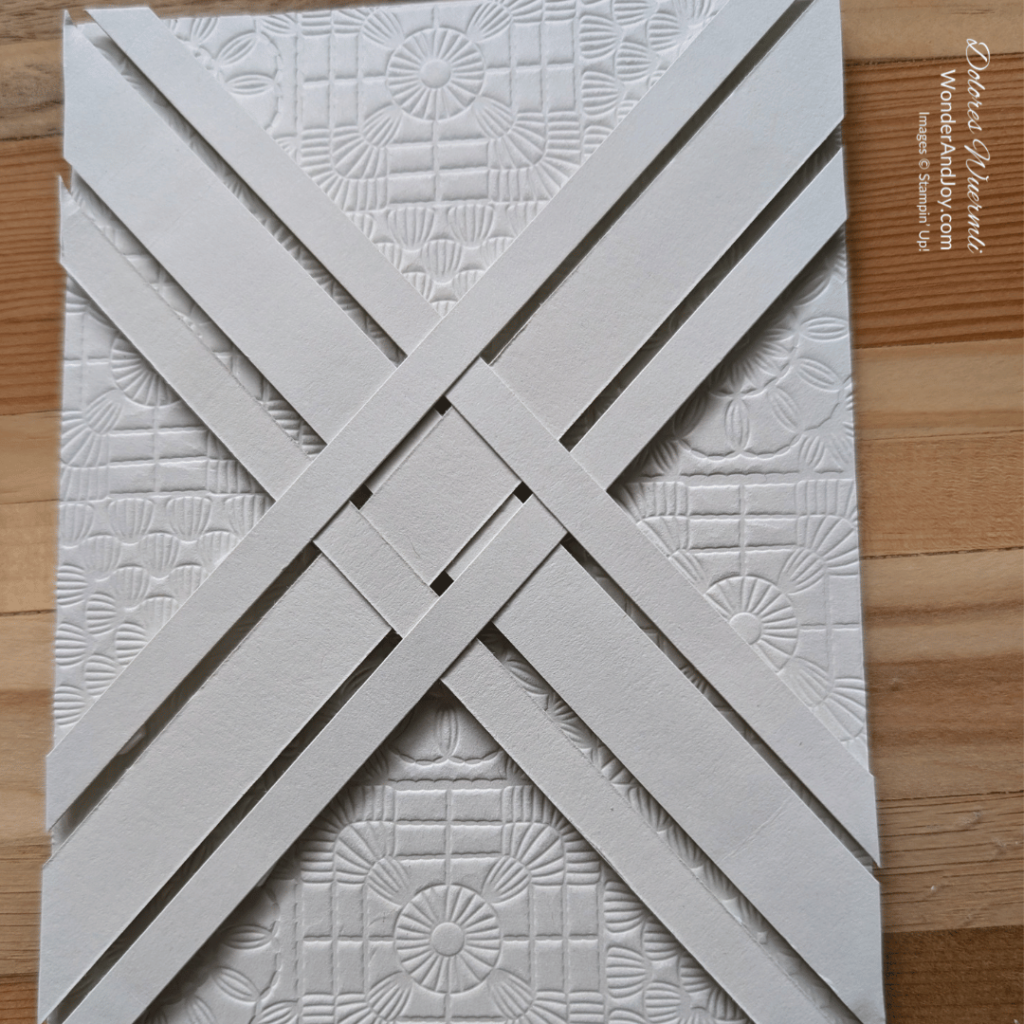
I cut a piece of Basic Beige Cardstock (#164511) measuring 5 ½” X 8 ½” and scored at 4 ¼” for the card base. For the mat piece I used Lost Lagoon Cardstock (#133679) cut at 5 3/8″ X 4 1/8″. I cut one piece of Basic Beige Cardstock (#164511) to 4″ X 5 1/4″ and ran it through the 3D Embossing Folder Cute Crochet (#163792). I cut strips from Basic Beige Cardstock (#164511), two measuring 7 ½” X ½” and four measuring 7 ½” X ¼”.

Using Mini Stampin’ Dimensionals (#144108), I adhered the strips to the embossed card cut at 4″ X 5 ¼” of Basic Beige, leaving an 1/8” gap between each strip. Starting with one ½” strip place the top of the strip at the top left corner, and then going diagonally down to the bottom right corner with the bottom of the strip to the corner. With the second ½” strip doing the same thing on the opposite corner to corner and adding a dab of Multipurpose Liquid Glue (#110755) in the centre.
Then, I choose a ¼” strip placing it below the first ½” strip with dimensionals and a bit of glue in the middle adhering it down. (You can also use the strip cut to size from the edges of the dimensional sheets leftover after using the hexagonal dimensionals.) Continue in this way until all four ¼” strips have been put onto the embossed cardstock.
Trim off the excess strips beyond the card. Glue this to the Lost Lagoon mat and then glue to the card base. This is a really special card layout that could be used for many occasions.
Now, decorate it how you like! I stamped the Magnolia double flower and the single one with Black Memento Ink (#132708) on Basic Beige Cardstock (#164511). I used Stampin’ Blends in Moody Mauve (#161660), Lemon Lolly (#161673) Granny Apple Green (#154885), and Lost Lagoon (#161680) to colour them. These flowers were die cut with the Magnolia Mood dies (#163506).
I also die cut some of the leaves in Lost Lagoon cardstock scraps and the flower in Moody Mauve cardstock scrap to add a few accents to the large magnolia. These were all attached to the centre of the piece with Multipurpose Liquid Glue (#110755).
Stamping the Happy Birthday sentiment on a scrap of Basic Beige cardstock with Lost Lagoon ink (#161678) and die cut with label shape from an exclusive paper pumpkin die, then adhering with dimensionals and a dab of glue. The small flower was adhered with glue to the inside of the card.
This was a really fun card to make and it looks very impressive. I hope you will give it a try. You can also add some gems if you would like but I thought the embossing folder shining through was perfect.
Remember to try this with colours and products you already own.
You can view a full list of the products that I used here. It includes the stamps, die cuts, cardstock, colours and adhesives. If you’d like to order any of the products, simply add them to your cart. A heartfelt THANK YOU in advance for selecting me to be your Stampin’ Up! ® Demonstrator. Do connect with me if you have any questions.
It’s been great to share this with you! Find some time this summer yet to enjoy the Wonder and Joy of stamping, creating and sharing what you make with others.
Blessings,
