A card template with a frame and new In Colours 2025-2027.
We are ready for some cheery, bright colours and the new In Colors 2025-2027 deliver on this very well. There are five colours: Strawberry Slush (returning colour), Timid Tiger, Darling Duckling, Cloud Cover and Secret Sea. The first three are great accent colours and work well with the other two colours. In my samples I have used all the colors in the cardstock.
There is some news about the Cloud Cover ink pad. A chemical reaction was happening with the ink and our foam pads, causing a change in the colour. Stampin’ Up has decided not to release the ink pad for sale to customers because it doesn’t meet our quality standards. However, you can buy the ink refill and ink spots. There will be a collection of five ink spots that will include Cloud Cover, or you can buy the uninked Stampin’ spots. These pads are felt and the ink doesn’t change with them. We have options!
Secret Sea is a dark blue/black and is great for sentiments or outlined stamps. This is becoming a favourite ink colour for me. I hope that you will want to try out these new colours. There is coordinating designer series paper, cardstock, pearls and blends as well.
I promised you a template, so let’s get into the cards I made for you to be inspired by.
Card Template 5
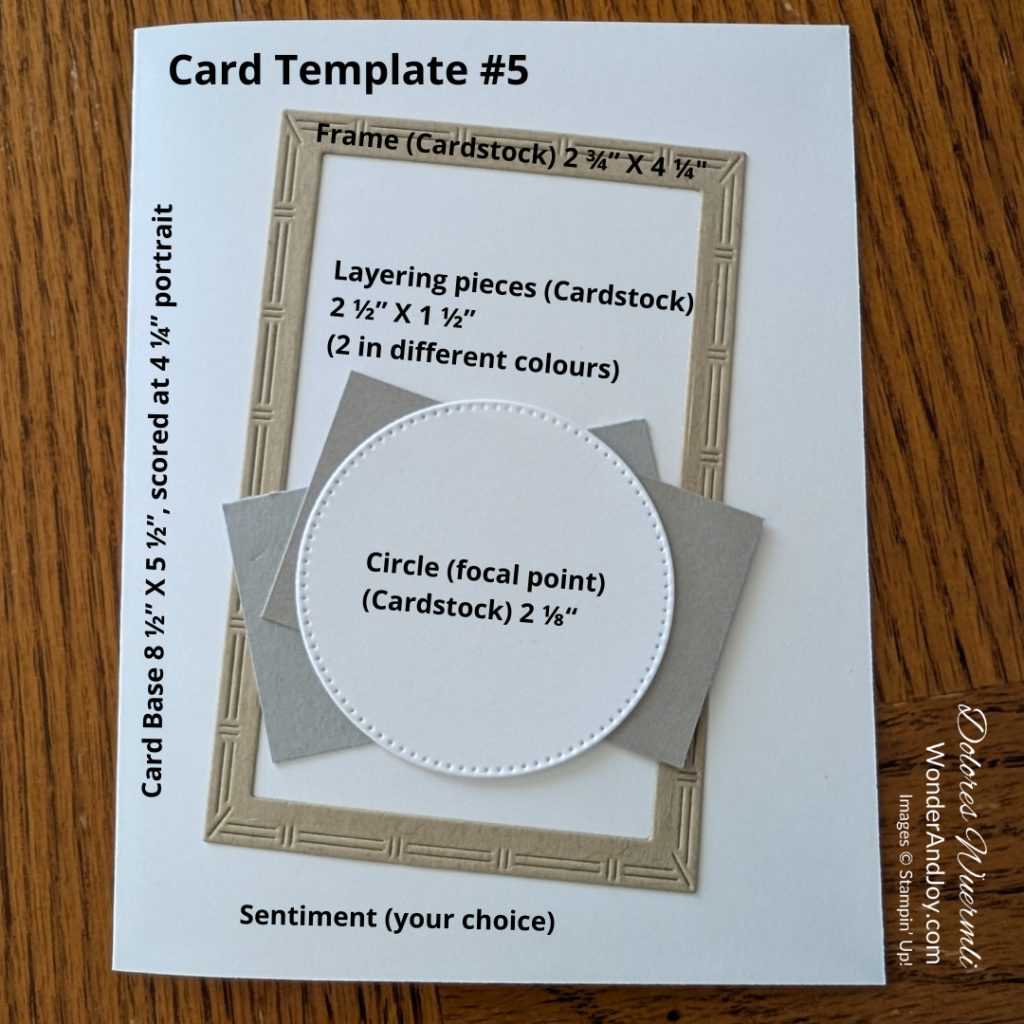
The template is a card base of 5 ½” X 8 ½” scored at 4 ¼”. I wanted a frame in the card and used the dies from Textured Notes, third and fourth smaller ones to create the frame 2 ¾” X 4 ¼” leaving an opening of
2 ¼” X 3 ¾”. The inside piece can be used for another project.
This die set creates a lovely impressed design in each piece. Textured Notes dies will be a keeper set for me. The other pieces for the card template are two pieces of cardstock in different colours measuring 2 ½” X 1 ½”. The final piece is a circle that I cut from Stylish Shapes Dies, 2 1/8″ circle (3rd one counting from largest die). This is also a great set of dies which has detail on each one.
Card Example #1: Turtle-y Awesome Birthday card
This Turtle-y Awesome suite of products caught my eye when I could preorder products from the new annual catalogue. They just sang joy to me! I am not disappointed. I hope that you enjoy this card and take a look at the products: page 48-51 and page 68-69 of the catalogue.
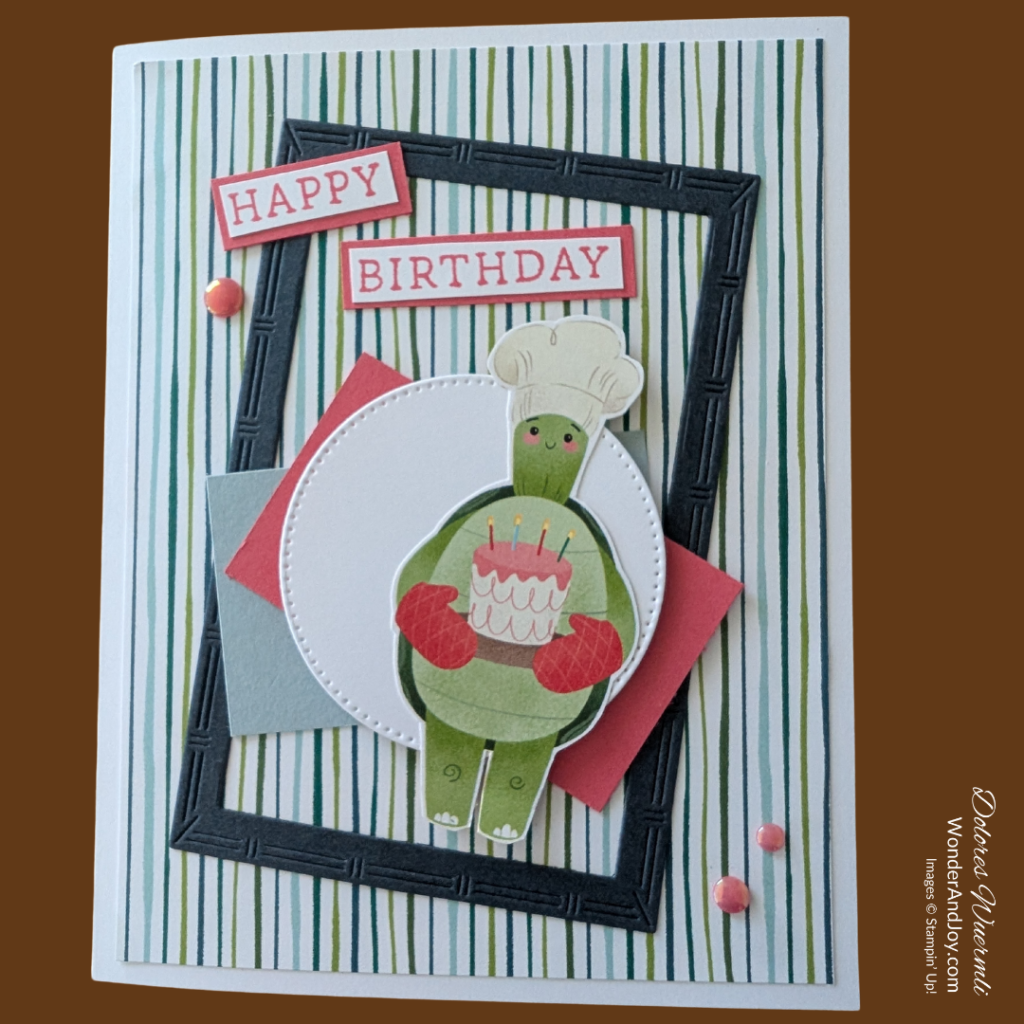
The card base is Basic White Cardstock (8 ½” X 5 ½” and scored at 4 ¼”). I adhered with Multipurpose Liquid Glue to the card base a piece of the striped Turtle-y Cute DSP (4″ X 5 ¼”). This size helps to get the most out of a 12X12 sheet of paper.
I made the frame from the Textured Notes die in Secret Sea cardstock and also glued this to the DSP on an angle. I cut a piece of Cloud Cover and Strawberry Slush cardstock to 2 ½” X 1 ½” layering them on top of each other at an angle. I cut a circle from the Stylish Shapes die with Basic White Cardstock.
From the DSP of Turtle-y Cute I fuzzy cute a turtle holding a birthday cake and adhered this to the circle with glue and dimensionals at his feet and hat. I added this on top of the Strawberry Slush card with dimensionals.
Using the Happy Birthday from Simply Said, I stamped this with Strawberry Slush ink on a piece of Basic White Cardstock and layered them on Strawberry Slush Cardstock. These I glued on the card. I added three Strawberry Slush pearls from the 2025-2027 In Color Flat Pearls, using the three different sizes
Inside the card, I stamped in Secret Sea “hope your birthday is turtle-y awesome!” and in Strawberry Slush the birthday cake. A great birthday card for anyone, don’t you agree?
Card Example #2: You are Remarkable Happy Birthday card
This card example #2 is also a Basic White cardstock base (8 ½” X 5 ½” and scored at 4 ¼”). The DSP Turtle-y Cute (4 X 5 ¼”) is a diagonal stripe and adhered to the cardbase.
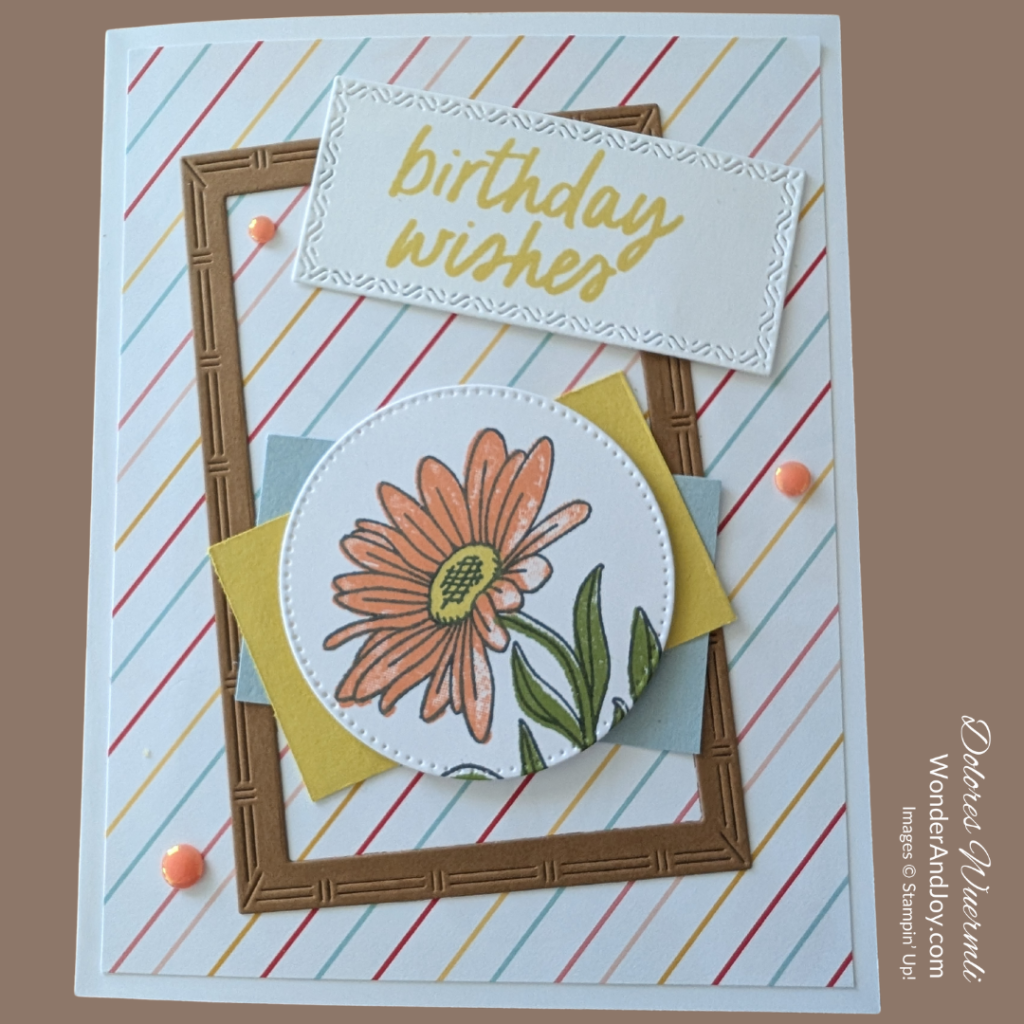
The frame from the Textured Notes dies in Pecan Pie cardstock is glued to the DSP on an angle in the opposite direction of the stripes on the DSP. I cut a piece of Cloud Cover and Darling Duckling cardstock to 2 ½” X 1 ½” layering them on top of each other at an angle.
I cut a circle from the Stylish Shapes die with Basic White Cardstock and stamped the outline flower from You Are Remarkable in Memento Black ink, and then inked the fill-in flower stamp with Timid Tiger and the center with Darling Duckling, the leaves were stamped with Old Olive ink. This stamp is so fun and easy to create beautiful distinctive flowers.
I used dimensionals on the back of the circle to adhere this to the top of the Darling Duckling cardstock piece. With a scrap piece of Basic White Cardstock, I stamped Birthday Wishes from Simply Said stamp set for the sentiment in Darling Duckling ink. Then, I used the second from the smallest die from Textured Notes dies, adhered to the card using glue dots in the four corners. It gives a bit of lift. I adhered three Timid Tiger embellishments from the 2025-2027 In Color Flat Pearls.
This is a fun spring birthday card!
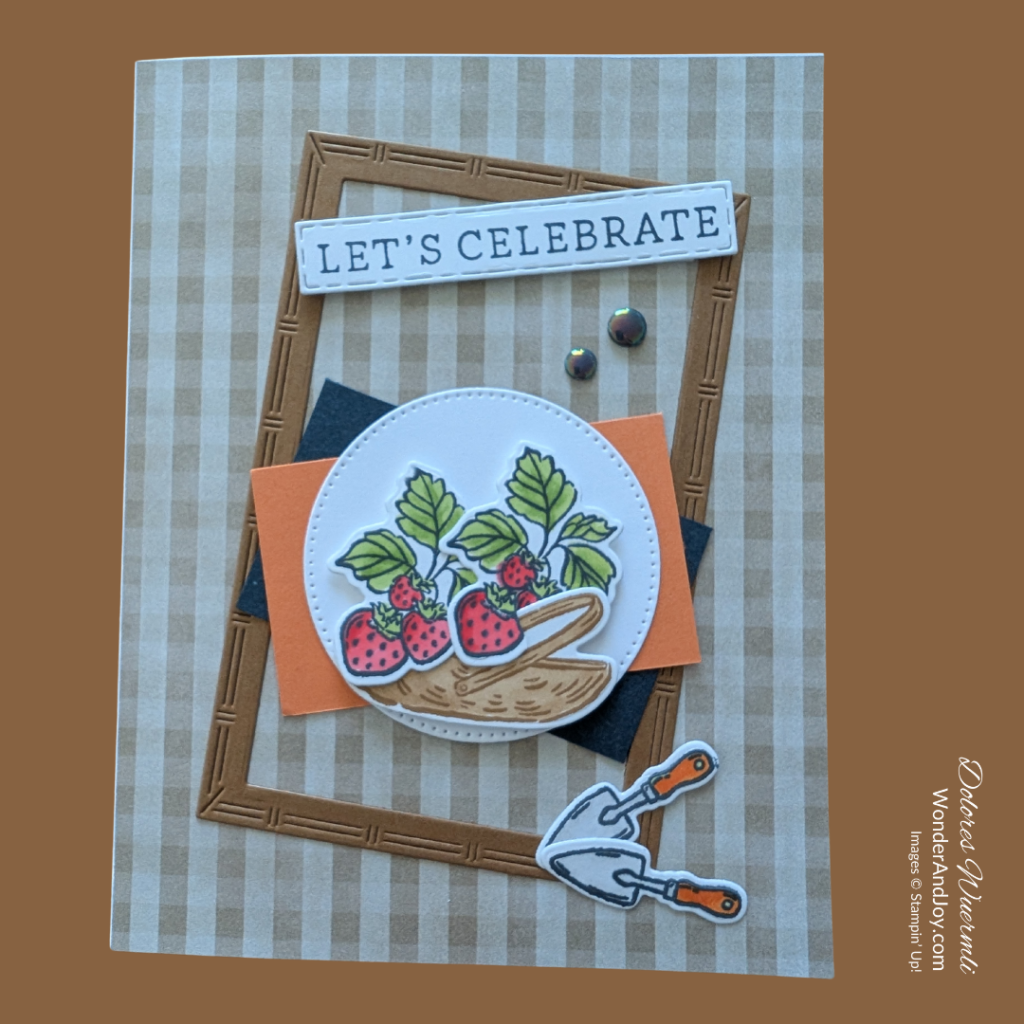
Card Example #3: Storybook Garden Patch Let’s Celebrate card
Storybook Garden Patch, Storybook Friends stamps and dies and the Storybook Moments Suite Collection are carrying over to Online Exclusives. I am really thankful for this. These two sets are so fun to stamp and colour with blends or watercolour pencils.
Take a sheet of Basic White cardstock and stamp as many images as you can fit on the page. Then color and die cut. You’ll have lots of fun with creating cards or scrapbook pages with these pieces.
The third card example also starts with a Basic White Card stock base (8 ½” X 5 ½” and scored at 4 ¼”). I used a brown DSP from the Timeless Plaid collection, also available online, and cut it to 4 ¼” X 5 ½” to cover the full front of the card. The pack of paper is 6″X6″ with lots of choices of great color and plaid designs.
The frame is from the Textured Notes dies in Pecan Pie cardstock and is also glued to the DSP on an angle to the right. I cut a piece of Secret Sea and Timid Tiger cardstock to 2 ½” X 1 ½” layering them on top of each other at an angle. I cut a circle from the Stylish Shapes die with Basic White Cardstock and adhered this to the top of the Timid Tiger cardstock.
I stamped two strawberries and two shovels in Black Memento Ink on a piece of Basic White Cardstock and colored them with blends. I also stamped the basket in Pecan Pie and then filled it in with blends. I used dimensionals to adhere the basket and strawberries to the circle. I cut a slit between one strawberry to have it go around the handle of the basket. The two shovels I glued to the bottom of the frame.
The sentiment was from Simply Said and I used “Let’s Celebrate” in Secret Sea ink on Basic White cardstock scrap. I used the long skinny die from the Textured Notes die and made it the length I needed to fit the sentiment. Are you interested to know how I did this?
The sentiment was adhered with dimensionals and placed at the top of the frame to give it good balance. I used two of the Secret Sea 2025-2027 In Color Flat Pearls to complete the card.
Which example from card #5 template are you going to try first?
I had fun creating these cards. The focal point can have whatever you want on it and you can choose the sentiment that you need for a card with lots of room to add it to the card to balance things.
I hope you will give this a try. If you don’t have rectangle dies you can always create a frame using your paper trimmer. Or use a different shape. I do think the frame adds character to these cards.
Bless someone this month with a card, letting them know you are thinking of them. Sending cards is a great way to share some love and paper hugs.
Let me know what you like about this card template!
I’d love to know what you think about this template. Comment below or send me a message.
Please view a full list of the products that I used here. It includes the stamps, die cuts, cardstock, designer series paper, colours and adhesives. If you’d like to order any of the products, simply add them to your cart.
For every order over $25 you receive 10% in rewards for your next order or until your rewards expire (usually in one year).
Remember to take a look at the amazing discounts on the Last Chance products. Check out my store to see what is still available.
Take a look at the 2025-2026 Annual Catalogue here.
THANK YOU for selecting me to be your Stampin’ Up! ® Demonstrator. I really appreciate your business.
Let me know if you have any questions or comments!
May you enjoy time creating and experiencing the Wonder and Joy of stamping!
Blessings,

Card Template #5 Dimensions
- Card Base 8 ½ X 5 ½ score at 4 ¼ Portrait
- Frame (Cardstock) 2 ¾ X 4 ¼
- Layering pieces (Cardstock) 2 ½ X 1 ½ (2 in different colours)
- Circle (focal point) (Cardstock) 2 ⅛
- Sentiment (your choice)
If you want a Mat for these pieces to be adhered to cut it at 4 ⅛ X 5 ⅜ using Cardstock or Designer Series Paper
Card Example 1: Turtle-y Awesome Birthday card
- Basic White Card Base 8 ½ X 5 ½ scored at 4 ¼
- DSP Turtle-y Cute – 4 X 5 ¼
- Secret Sea Cardstock – 3 X 4 ½ for frame
- Strawberry Slush Cardstock – 2 ½ X 1 ½
- Cloud Cover Cardstock – 2 ½ X 1 ½
- Basic White Cardstock – circle 2 ¼
- Scraps of Basic White and Strawberry Slush Cardstock
Card Example 2: You are Remarkable Happy Birthday card
- Basic White Card Base 8 ½ X 5 ½ scored at 4 ¼
- DSP Turtle-y Cute – 4 X 5 ¼
- Pecan Pie Cardstock – 3 X 4 ½ for frame
- Darling Duckling Cardstock – 2 ½ X 1 ½
- Cloud Cover Cardstock – 2 ½ X 1 ½
- Basic White Cardstock – circle 2 ¼
- Scraps of Basic White Cardstock
Card Example 3: Storybook Garden Patch Let’s Celebrate card
- Basic White Card Base 8 ½ X 5 ½ scored at 4 ¼
- DSP Timeless Plaid – 4 X 5 ¼
- Pecan Pie Cardstock – 3 X 4 ½ for frame
- Timid Tiger Cardstock – 2 ½ X 1 ½
- Secret Sea Cardstock – 2 ½ X 1 ½
- Basic White Cardstock – circle 2 ¼
- Scraps of Basic White Cardstock